For most patients (8 years and older), they will receive a few if not all of the instruments listed below (each instrument has between 3 and 8 items) upon admission and varying frequencies between admission and discharge timepoints. These instruments will appear in gray within the patient's PROM settings:
- PROMIS Depression* [Adult | Pediatric]
- PROMIS Anxiety* [Adult | Pediatric]
- PROMIS Sleep Disturbance* [Adult | Pediatric]
- PROMIS Sleep-Related Impairment* (if PROMIS Sleep Disturbance score is moderate or higher) [Adult | Pediatric]
- Tobacco Use Screen [Adult | Pediatric]
- AUDIT-C* [Adult | Pediatric]
- PROMIS Alcohol Use (if AUDIT-C is positive)* [Adult | Pediatric]
- NIDA Substance Use Screener* [Adult | Pediatric]
- PROMIS Severity of Substance Use (if NIDA Substance Use Screener is positive)* [Adult | Pediatric]
- Fall Screen (for patients aged 65+ years) [Adult]
- Vulnerability to Abuse Screening Scale (for patients aged 65+ years) [Adult]
*NOTE: Parent-proxy versions for these PROMs are available patients ages 5-17 years old. Providers can use the steps below to customize the Proxy PROM battery as needed.
As a provider, you can also customize your patients' PROM instruments and set the frequency for each. If you are a program manager and would like to customize PROMs for all patients in a program, please reach out to us via Support.
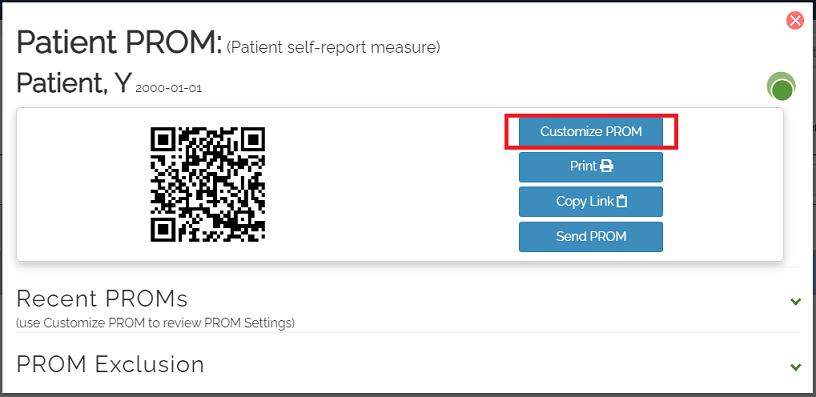
- On the dashboard, select your patient's PROM button (use the Patient PROM column for self-report measures and the Proxy PROM column for parent/caregiver proxy-report measures).
Select Customize PROM.
Image
Select the + to add a new PROM instrument.
**If your site manager has added PROMs, these will appear in gray in the PROM Settings.**In this new panel:
- Select PROM: Select the PROM instrument that you want your patients to complete
- Repeating By: Select if you want this PROM to be available (i.e. sent via email & text message) for your patient at the time of their appointment or based on an interval (i.e. your patient may receive a PROM email or text message outside of their regular appointment schedule).
- Start Date: Click the date module to select when you want this PROM setting to be begin (i.e. when will this PROM instrument be sent to your patient for the first time).
- Days between PROM: Select the amount of time that should elapse between PROMs for your patient.
- Select Save and the PROM Settings menu will update to show your changes.
Your selections will appear with additional information:
- Start date - shows when the PROM was first set up for the patient
- Last available - shows when the PROM was last available / sent to the patient via email or text
- Last completed - shows when the PROM was last completed (this will begin to populate the date as time goes on)
- Next available - shows when the PROM will be available / sent to the patient again (this will show NA if there is no scheduling data beyond the frequency set for the PROM)
Select the gear icon to update any currently selected PROMs. PROMS added by your site manager will appear in gray, below your PROM Settings.Image
As you patient begins completing PROMs, the Recent PROMs section will display the following information:
- Currently Available - if there is a QR code available for your patient, this shows the PROM(s) included with that QR code / link sent to their email or cell phone
- Last available (date) - shows the PROM(s) that were last available / sent to the patient (this will begin to populate the instrument names as time goes on)
- Last completed (date) - shows the last PROM(s) that your patient completed
Please continue reading to learn how you can send PROM questionnaires to your patients.
